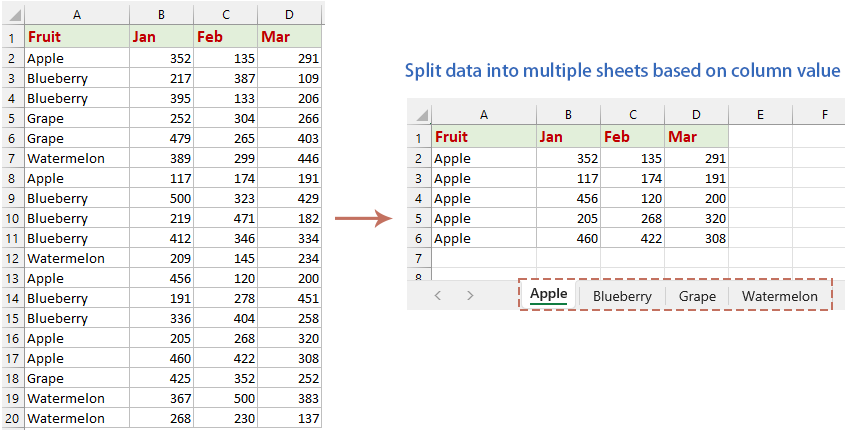
Excel 팁: 열 값을 기준으로 데이터를 여러 워크시트/통합 문서로 분할
Excel에서 대규모 데이터 세트를 관리할 때 특정 열 값을 기준으로 데이터를 여러 워크시트로 분할하는 것이 매우 유용할 수 있습니다. 이 방법은 데이터의 구성을 향상시킬 뿐만 아니라 가독성을 높이고 데이터 분석을 더 쉽게 해줍니다.
제품 이름, 1분기 판매 수량 등 여러 항목이 포함된 대규모 판매 기록이 있다고 가정해 보겠습니다. 목표는 이 데이터를 각 제품 이름을 기준으로 별도의 워크시트로 분할하여 개별 판매 실적을 별도로 분석하는 것입니다.
VBA 코드를 사용하여 열 값을 기준으로 데이터를 여러 통합 문서로 분할
열 값을 기준으로 데이터를 여러 워크시트로 분할
일반적으로 데이터 목록을 먼저 정렬한 다음 이를 하나씩 복사하여 다른 새 워크시트에 붙여 넣을 수 있습니다. 하지만 이를 반복해서 복사하고 붙여넣으려면 인내심이 필요합니다. 이 섹션에서는 Excel에서 이 작업을 효율적으로 처리하여 시간을 절약하고 오류 가능성을 줄이는 두 가지 간단한 방법을 소개합니다.
VBA 코드를 사용하여 열 값을 기준으로 데이터를 여러 워크시트로 분할
1. ALT + F11 키를 눌러 응용 프로그램 용 Microsoft Visual Basic 창.
2. 클릭 끼워 넣다 > 모듈을 클릭하고 모듈 창에 다음 코드를 붙여 넣습니다.
Sub Splitdatabycol()
'updateby Extendoffice
Dim lr As Long
Dim ws As Worksheet
Dim vcol, i As Integer
Dim icol As Long
Dim myarr As Variant
Dim title As String
Dim titlerow As Integer
Dim xTRg As Range
Dim xVRg As Range
Dim xWSTRg As Worksheet
Dim xWS As Worksheet
On Error Resume Next
Set xTRg = Application.InputBox("Please select the header rows:", "Kutools for Excel", "", Type:=8)
If TypeName(xTRg) = "Nothing" Then Exit Sub
Set xVRg = Application.InputBox("Please select the column you want to split data based on:", "Kutools for Excel", "", Type:=8)
If TypeName(xVRg) = "Nothing" Then Exit Sub
vcol = xVRg.Column
Set ws = xTRg.Worksheet
lr = ws.Cells(ws.Rows.Count, vcol).End(xlUp).Row
title = xTRg.AddressLocal
titlerow = xTRg.Cells(1).Row
icol = ws.Columns.Count
ws.Cells(1, icol) = "Unique"
Application.DisplayAlerts = False
If Not Evaluate("=ISREF('xTRgWs_Sheet!A1')") Then
Sheets.Add(after:=Worksheets(Worksheets.Count)).Name = "xTRgWs_Sheet"
Else
Sheets("xTRgWs_Sheet").Delete
Sheets.Add(after:=Worksheets(Worksheets.Count)).Name = "xTRgWs_Sheet"
End If
Set xWSTRg = Sheets("xTRgWs_Sheet")
xTRg.Copy
xWSTRg.Paste Destination:=xWSTRg.Range("A1")
ws.Activate
For i = (titlerow + xTRg.Rows.Count) To lr
On Error Resume Next
If ws.Cells(i, vcol) <> "" And Application.WorksheetFunction.Match(ws.Cells(i, vcol), ws.Columns(icol), 0) = 0 Then
ws.Cells(ws.Rows.Count, icol).End(xlUp).Offset(1) = ws.Cells(i, vcol)
End If
Next
myarr = Application.WorksheetFunction.Transpose(ws.Columns(icol).SpecialCells(xlCellTypeConstants))
ws.Columns(icol).Clear
For i = 2 To UBound(myarr)
ws.Range(title).AutoFilter field:=vcol, Criteria1:=myarr(i) & ""
If Not Evaluate("=ISREF('" & myarr(i) & "'!A1)") Then
Set xWS = Sheets.Add(after:=Worksheets(Worksheets.Count))
xWS.Name = myarr(i) & ""
Else
xWS.Move after:=Worksheets(Worksheets.Count)
End If
xWSTRg.Range(title).Copy
xWS.Paste Destination:=xWS.Range("A1")
ws.Range("A" & (titlerow + xTRg.Rows.Count) & ":A" & lr).EntireRow.Copy xWS.Range("A" & (titlerow + xTRg.Rows.Count))
Sheets(myarr(i) & "").Columns.AutoFit
Next
xWSTRg.Delete
ws.AutoFilterMode = False
ws.Activate
Application.DisplayAlerts = True
End Sub
3. 그런 다음 F5 키를 눌러 코드를 실행하면 헤더 행을 선택하라는 메시지 상자가 팝업됩니다. OK. 스크린 샷보기 :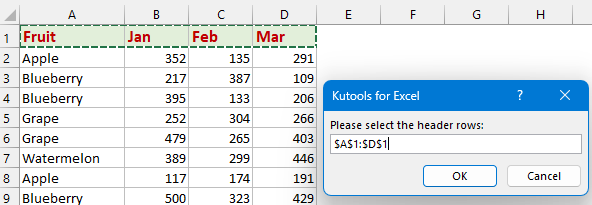
4. 두 번째 프롬프트 상자에서 분할하려는 열 데이터를 선택한 후 다음을 클릭하십시오. OK. 스크린 샷보기 :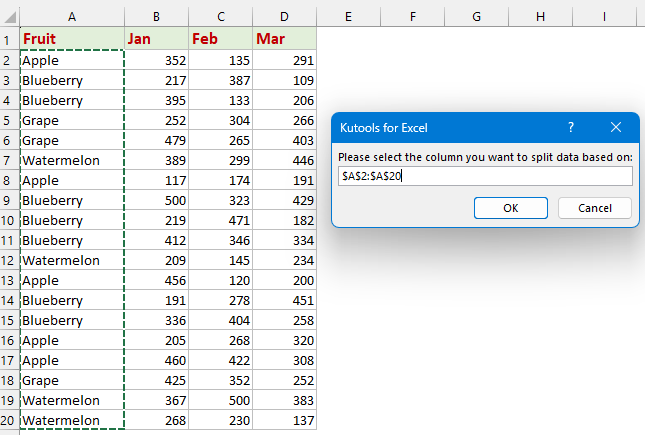
5. 활성 워크시트의 모든 데이터는 열 값을 기준으로 여러 워크시트로 나뉩니다. 결과 워크시트는 분할된 셀의 값에 따라 이름이 지정되고 통합 문서의 끝에 배치됩니다. 스크린샷 보기:
Excel 용 Kutools를 사용하여 열 값을 기반으로 데이터를 여러 워크 시트로 분할
Excel 용 Kutools 스마트 기능 제공 – 데이터 분할 Excel 환경으로 바로 이동하세요. 데이터를 여러 워크시트로 분할하는 것은 더 이상 어려운 일이 아닙니다. 우리의 직관적인 도구는 선택한 열 값이나 행 수를 기준으로 데이터 세트를 자동으로 나누어 각 정보가 정확히 필요한 곳에 있는지 확인합니다. 스프레드시트를 수동으로 구성하는 지루한 작업에 작별을 고하고 더 빠르고 오류 없는 데이터 관리 방법을 채택하세요.
설치 후 Excel 용 Kutools, 데이터 범위를 선택한 다음 쿠툴즈 플러스 > 데이터 분할 를 열려면 데이터를 여러 워크시트로 분할 대화 상자.
- 선택 특정 열 에서 옵션 기준 분할 섹션을 클릭하고 드롭다운 목록에서 데이터를 분할하려는 열 값을 선택합니다.
- 데이터에 머리글이 있고 이를 각각의 새로운 분할 워크시트에 삽입하려면 다음을 확인하세요. 내 데이터에 헤더가 있습니다. 옵션. (데이터에 따라 헤더 행 수를 지정할 수 있습니다. 예를 들어 데이터에 헤더가 2개 포함된 경우 XNUMX를 입력하세요.)
- 그런 다음 분할 워크 시트 이름을 지정할 수 있습니다. 새 워크 시트 이름 섹션의 규칙 드롭다운 목록에서 워크시트 이름 규칙을 지정하고 접두사 or 접미사 시트 이름도 마찬가지입니다.
- 클릭 OK 단추. 스크린 샷보기 :

이제 워크시트의 데이터가 새 통합 문서에서 여러 워크시트로 분할됩니다.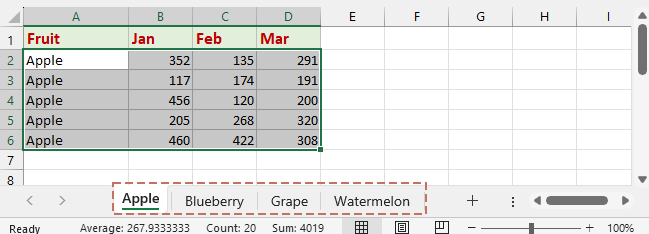
VBA 코드를 사용하여 열 값을 기준으로 데이터를 여러 통합 문서로 분할
경우에 따라 데이터를 여러 워크시트로 나누는 것보다 키 열을 기준으로 데이터를 별도의 통합 문서로 나누는 것이 더 유리할 수 있습니다. 다음은 VBA 코드를 사용하여 특정 열 값을 기준으로 데이터를 여러 통합 문서로 분할하는 프로세스를 자동화하는 방법에 대한 단계별 가이드입니다.
1. ALT + F11 키를 눌러 응용 프로그램 용 Microsoft Visual Basic 창.
2. 클릭 끼워 넣다 > 모듈을 클릭하고 다음 코드를 모듈 창.
Sub SplitDataByColToWorkbooks()
    ' Updateby Extendoffice
    Dim lr As Long
    Dim ws As Worksheet
    Dim vcol, i As Integer
    Dim myarr As Variant
    Dim title As String
    Dim titlerow As Integer
    Dim xTRg As Range
    Dim xVRg As Range
    Dim xWS As Workbook
    Dim savePath As String
    ' Set the directory to save new workbooks
    savePath = "C:\Users\AddinsVM001\Desktop\multiple files\" ' Modify this path as needed
    Application.DisplayAlerts = False
    Set xTRg = Application.InputBox("Please select the header rows:", "Kutools for Excel", Type:=8)
    If TypeName(xTRg) = "Nothing" Then Exit Sub
    Set xVRg = Application.InputBox("Please select the column you want to split data based on:", "Kutools for Excel", Type:=8)
    If TypeName(xVRg) = "Nothing" Then Exit Sub
    vcol = xVRg.Column
    Set ws = xTRg.Worksheet
    lr = ws.Cells(ws.Rows.Count, vcol).End(xlUp).Row
    title = xTRg.Address(False, False)
    titlerow = xTRg.Row
    ws.Columns(vcol).AdvancedFilter Action:=xlFilterCopy, CopyToRange:=ws.Cells(1, ws.Columns.Count), Unique:=True
    myarr = Application.Transpose(ws.Cells(1, ws.Columns.Count).Resize(ws.Cells(ws.Rows.Count, ws.Columns.Count).End(xlUp).Row).Value)
    ws.Cells(1, ws.Columns.Count).Resize(ws.Cells(ws.Rows.Count, ws.Columns.Count).End(xlUp).Row).ClearContents
    For i = 2 To UBound(myarr)
        Set xWS = Workbooks.Add
        ws.Range(title).AutoFilter Field:=vcol, Criteria1:=myarr(i)
        ws.Range("A" & titlerow & ":A" & lr).SpecialCells(xlCellTypeVisible).EntireRow.Copy
        xWS.Sheets(1).Cells(1, 1).PasteSpecial Paste:=xlPasteAll
        xWS.SaveAs Filename:=savePath & myarr(i) & ".xlsx"

        xWS.Close SaveChanges:=False
    Next i
    ws.AutoFilterMode = False
    Application.DisplayAlerts = True
    ws.Activate
End Sub
3. 그런 다음 F5 키를 눌러 코드를 실행하면 헤더 행을 선택하라는 메시지 상자가 팝업됩니다. OK. 스크린 샷보기 :
4. 두 번째 프롬프트 상자에서 분할하려는 열 데이터를 선택한 후 다음을 클릭하십시오. OK. 스크린 샷보기 :
5. 분할 후 활성 워크시트의 모든 데이터는 열 값을 기준으로 여러 통합 문서로 나뉩니다. 모든 분할 통합 문서는 지정한 폴더에 저장됩니다. 스크린샷 보기: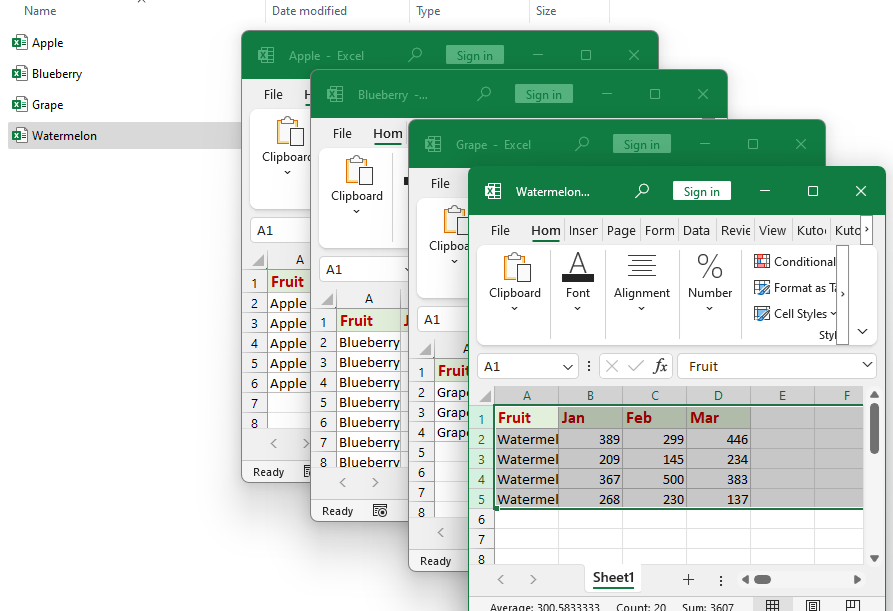
관련 기사:
- 행 수를 기준으로 데이터를 여러 워크 시트로 분할
- 특정 행 수를 기준으로 대규모 데이터 범위를 여러 Excel 워크시트로 효율적으로 나누면 데이터 관리가 간소화될 수 있습니다. 예를 들어 5개 행마다 데이터세트를 여러 시트로 분할하면 관리하기 쉽고 체계적으로 구성할 수 있습니다. 이 가이드에서는 이 작업을 빠르고 쉽게 수행할 수 있는 두 가지 실용적인 방법을 제공합니다.
- 키 열을 기반으로 두 개 이상의 테이블을 하나로 병합
- 통합 문서에 세 개의 테이블이 있다고 가정하면 아래 스크린 샷과 같은 결과를 얻기 위해 해당 키 열을 기반으로 이러한 테이블을 하나의 테이블로 병합하려고합니다. 이것은 우리 대부분에게 번거로운 작업 일 수 있지만 걱정하지 마십시오.이 기사에서는이 문제를 해결하는 몇 가지 방법을 소개합니다.
- 구분 기호로 텍스트 문자열을 여러 행으로 분할
- 일반적으로 텍스트를 열로 기능을 사용하여 쉼표, 점, 세미콜론, 슬래시 등과 같은 특정 구분 기호로 셀 내용을 여러 열로 분할할 수 있습니다. 그러나 경우에 따라 구분된 셀 내용을 여러 행으로 분할해야 할 수도 있습니다. 아래 표시된 스크린샷과 같이 다른 열의 데이터를 반복합니다. Excel에서 이 작업을 처리할 수 있는 좋은 방법이 있습니까? 이 자습서에서는 Excel에서 이 작업을 완료하는 몇 가지 효과적인 방법을 소개합니다.
- 여러 줄의 셀 내용을 별도의 행/열로 분할
- Alt + Enter로 구분된 여러 줄 셀 내용이 있고 이제 여러 줄 내용을 분리된 행이나 열로 분할해야 한다고 가정할 때 무엇을 할 수 있습니까? 이 문서에서는 여러 줄로 된 셀 내용을 분리된 행이나 열로 빠르게 분할하는 방법을 배웁니다.
최고의 사무 생산성 도구
| 🤖 | Kutools AI 보좌관: 다음을 기반으로 데이터 분석을 혁신합니다. 지능형 실행 | 코드 생성 | 사용자 정의 수식 만들기 | 데이터 분석 및 차트 생성 | Kutools 기능 호출... |
| 인기 기능: 중복 항목 찾기, 강조 표시 또는 식별 | 빈 행 삭제 | 데이터 손실 없이 열이나 셀 결합 | 수식없이 반올림 ... | |
| 슈퍼 조회: 다중 기준 VLookup | 다중 값 VLookup | 여러 시트에 걸친 VLookup | 퍼지 조회 .... | |
| 고급 드롭다운 목록: 드롭다운 목록을 빠르게 생성 | 종속 드롭다운 목록 | 다중 선택 드롭 다운 목록 .... | |
| 열 관리자: 특정 개수의 열 추가 | 열 이동 | Toggle 숨겨진 열의 가시성 상태 | 범위 및 열 비교 ... | |
| 특색 지어진 특징: 그리드 포커스 | 디자인보기 | 큰 수식 바 | 통합 문서 및 시트 관리자 | 리소스 라이브러리 (자동 텍스트) | 날짜 선택기 | 워크 시트 결합 | 셀 암호화/해독 | 목록으로 이메일 보내기 | 슈퍼 필터 | 특수 필터 (굵게/기울임꼴/취소선 필터링...) ... | |
| 상위 15개 도구 세트: 12 본문 도구 (텍스트 추가, 문자 제거,...) | 50+ 거래차트 유형 (Gantt 차트,...) | 40+ 실용 방식 (생일을 기준으로 나이 계산,...) | 19 삽입 도구 (QR 코드 삽입, 경로에서 그림 삽입,...) | 12 매출 상승 도구 (숫자를 단어로, 환율,...) | 7 병합 및 분할 도구 (고급 결합 행, 셀 분할,...) | ... 그리고 더 |
Excel용 Kutools로 Excel 기술을 강화하고 이전과는 전혀 다른 효율성을 경험해 보세요. Excel용 Kutools는 생산성을 높이고 시간을 절약하기 위해 300개 이상의 고급 기능을 제공합니다. 가장 필요한 기능을 얻으려면 여기를 클릭하십시오...
")
Office Tab은 Office에 탭 인터페이스를 제공하여 작업을 훨씬 쉽게 만듭니다.
- Word, Excel, PowerPoint에서 탭 편집 및 읽기 사용, Publisher, Access, Visio 및 Project.
- 새 창이 아닌 동일한 창의 새 탭에서 여러 문서를 열고 만듭니다.
- 생산성을 50% 높이고 매일 수백 번의 마우스 클릭을 줄입니다!
")