메인 컨텐츠로 가기

Outlook의 메일 목록에서 보낸 사람의 도메인을 보는 방법은 무엇입니까?

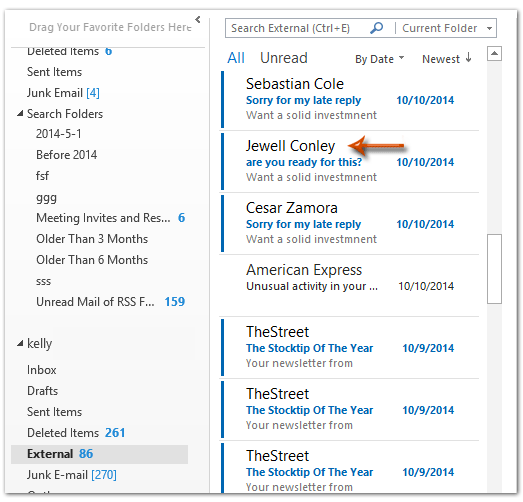
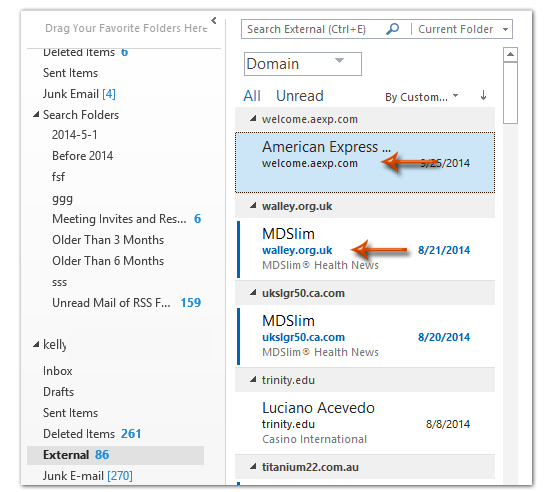
Outlook에서 메일 목록에 보낸 사람의 표시 이름 만 표시하는 이상한 보낸 사람으로부터 일부 전자 메일 메시지를 받았습니까? 다음 스크린 샷을 참조하십시오. 일부 Outlook 사용자는 전자 메일 메시지를 열기 전에 보낸 사람의 전자 메일 도메인을 가져 오는 것이 더 안전하다고 생각할 수 있습니다. 이 기사에서는 Microsoft Outlook의 메일 목록에서 보낸 사람의 전자 메일 도메인을 보거나 표시하는 방법을 보여줍니다.

Office 탭 - Microsoft Office에서 탭 편집 및 탐색을 활성화하여 작업을 원활하게 만듭니다.
Outlook용 Kutools - 탁월한 효율성을 위한 100개 이상의 고급 기능으로 Outlook 향상
이러한 고급 기능으로 Outlook 2021~2010 또는 Outlook 365를 향상하세요. 포괄적인 60일 무료 평가판을 즐기고 이메일 경험을 향상시키십시오!

Microsoft Outlook의 메일 목록에서 보낸 사람의 이메일 도메인을 보거나 표시하려면 다음 방법에 따라 가져올 수 있습니다.

1 단계 : 보낸 사람의 이메일 도메인을 보거나 표시 할 메일 폴더를 엽니 다.

2 단계 : 열 추가 온 버튼 관측 탭.

주의 사항: Outlook 2007에서는 관측 > 현재보기 > 현재보기 사용자 지정를 클릭 한 다음 Fields 팝업 사용자 정의보기 : 압축 대화 상자에서 버튼을 클릭합니다.

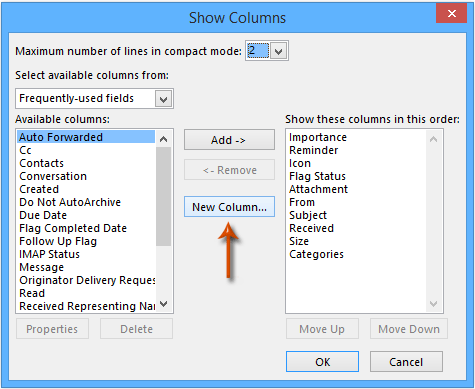
3 단계 : 다음 열 표시 (또는 필드 표시) 대화 상자에서 새 열 버튼 (또는 새 필드 단추).

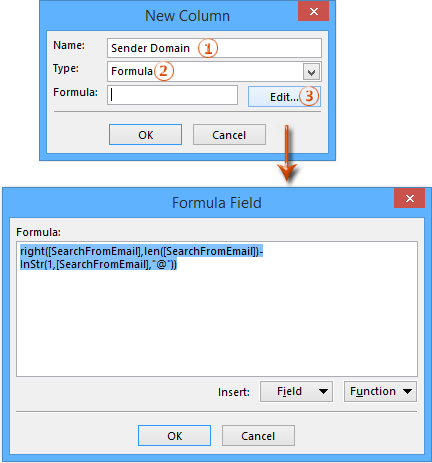
3 단계 : 이제 새 열 (또는 새 필드) 대화 상자로 이동합니다.

(1) 성함 상자에이 생성 열의 새 이름을 입력합니다.

(2) 타입 상자를 선택하고 공식 드롭 다운 목록에서.

(3) 편집 버튼을 누른 후 다음 텍스트를 공식 대화 상자의 상자. 아래 스크린 샷을 참조하십시오.

right ([SearchFromEmail], len ([SearchFromEmail])-InStr (1, [SearchFromEmail], "@"))

(4) 모두 클릭 OK 버튼을 눌러 두 개의 대화 상자를 닫습니다.

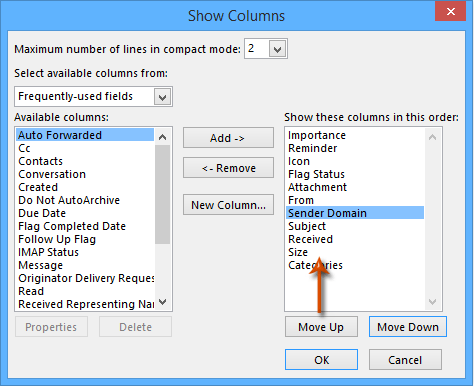
4 단계 : 이제 열 표시 (또는 필드 표시) 대화 상자로 돌아가서 새로 만든 열을 선택합니다. 이 열을이 순서로 표시 상자, 아래로 이동 ~. 아래 스크린 샷을 참조하십시오.

5 단계 : OK 버튼.

이제 각 보낸 사람의 이메일 도메인이 추가되고 보낸 사람의 표시 이름 아래에 표시됩니다. 다음 스크린 샷을 참조하십시오.

Outlook에서이 사용자 정의보기를 저장하는 방법을 얻으려면 Outlook의 다른 폴더에보기 설정을 저장하고 복사하는 방법은 무엇입니까?


화살표 블루 오른쪽 거품관련 기사

Outlook에서 보낸 사람 도메인별로 정렬하고 그룹화하는 방법은 무엇입니까?


최고의 사무 생산성 도구

Outlook 용 Kutools - 귀하의 전망을 강화하는 100개 이상의 강력한 기능

🤖 AI 메일 도우미: AI 마법이 적용된 즉각적인 전문가 이메일 - 원클릭으로 천재적인 답변, 완벽한 어조, 다국어 숙달이 가능합니다. 손쉽게 이메일을 변환하세요! ...

📧 이메일 자동화: 부재중(POP 및 IMAP에서 사용 가능)  /  이메일 보내기 예약  /  이메일 발송 시 규칙에 따른 자동 참조/숨은참조  /  자동 전달(고급 규칙)   /  인사말 자동 추가   /  여러 수신자 이메일을 개별 메시지로 자동 분할 ...

📨 이메일 관리: 이메일을 쉽게 기억할 수 있습니다.  /  제목 및 기타 사기 이메일 차단  /  중복 이메일 삭제  /  고급 검색  /  폴더 통합 ...

📁 첨부 파일 프로일괄 저장  /  일괄 분리  /  일괄 압축  /  자동 저장   /  자동 분리  /  자동 압축 ...

🌟 인터페이스 매직: 😊더 예쁘고 멋진 이모티콘   /  탭 보기로 Outlook 생산성 향상  /  문을 닫는 대신 전망을 최소화하세요 ...

???? 원클릭 불가사의: 수신 첨부 파일과 함께 전체 회신  /   피싱 방지 이메일  /  🕘발신자의 시간대 표시 ...

👩🏼‍🤝‍👩🏻 연락처 및 캘린더: 선택한 이메일에서 연락처 일괄 추가  /  연락처 그룹을 개별 그룹으로 분할  /  생일 알림 제거 ...

이상 100 특징 당신의 탐험을 기다려주세요! 더 알아보려면 여기를 클릭하세요.


Comments (30)
No ratings yet. Be the first to rate!
This comment was minimized by the moderator on the site
I receive emails from team members that are no longer with the company, and they are just aliases on my exchange account. When someone sends an email to one of the alias's it shows addressed to me unless i look at the header properties. Is there a way to get outlook to show who the original email address was sent to instead of me?
This comment was minimized by the moderator on the site
Спасибо, а есть формула, чтобы в отправленных был виден адрес "кому отправлено"?
This comment was minimized by the moderator on the site
Hi there,

You can first select the Sent box, and then do as instructed in the artcile, but use the code: right([To],len([To])-InStr(1,[To],"@"))
Note that if you have more than one recipients, it will show the domain of the first recipient and full address of other recipients.

If you want to show Cc and Bcc recipients as well, you can create two more columns by following the exact steps. Remember to change [To] in the code right([To],len([To])-InStr(1,[To],"@")) to corresponding code: [Cc] or [Bcc]

Amanda
This comment was minimized by the moderator on the site
К сожалению, формула вставляет только имя получателя, но не его e-mail
This comment was minimized by the moderator on the site
Go to View > View settings > Columns
Click "new Columns"

Name : External
Type : FormulaFormula : IIf(InStr([SearchFromEmail],"@")=0,"",Left([SearchFromEmail],InStr([SearchFromEmail],"@")-1)+"@"+Mid([SearchFromEmail],InStr([SearchFromEmail],"@")+1))

Click OK..Ok..


This comment was minimized by the moderator on the site
I wish it would work for "SearchToEmail" as well. But this is only wishful thinking ...
This comment was minimized by the moderator on the site
Great Solution - works 99% of the time.  Almost every email now shows the 'Name' of the sender and immediately below the name, it shows the domain as well. 
ISSUE: The initial suspicious email that triggered this concern still shows a blank line under the sender's name.  Thoughts?
This comment was minimized by the moderator on the site
I agree with Matt. The string from themoonandthelily, "right(([SearchFromEmail],[SearchFromEmail]),InStr(1,[SearchFromEmail],"@"))", causes Outlook to crash, closing it immediately when selecting an email.

Too bad, because it was a very welcome addition.
This comment was minimized by the moderator on the site
Why does SearchToEmail not work? All the solutions are for the From column only.
This comment was minimized by the moderator on the site
I really loved this solution. However, my outlook keeps on crashing with the addition of this new column. I spent hours on with Microsoft tech support and they said to delete this column and that it seems to be an issue with Outlook. Really would love another solution to put senders address into the message preview. Disappointed that Microsoft support couldn't offer me any solutions to the crashing except for running Outlook in "cleanviews" :(
This comment was minimized by the moderator on the site
Anyone can provide a formula edit which show sender's domain or e-mail address, BUT from headers of e-mail - from Received: field. That would be useful for determine if the e-mail is spoofed or it's real!
This comment was minimized by the moderator on the site
Yes this is what I would prefer as well. Have you come across something like this yet?
This comment was minimized by the moderator on the site
Muy bueno..Thanks :)
There are no comments posted here yet
Load More
Please leave your comments in English
Posting as Guest
×
Rate this post:
0   Characters
Suggested Locations