Excel에서 달력을 만드는 방법은 무엇인가요?
Excel 달력은 누군가가 새 직장을 시작하거나 무언가를 배달해야 하는 시기와 같이 중요한 이벤트를 추적하는 데 도움을 줍니다. 이를 통해 이러한 날짜를 쉽게 확인할 수 있습니다. 이 가이드에서는 Excel에서 월별 및 연간 달력을 만드는 방법을 보여드리겠습니다. 우리는 빠른 설정을 위해 템플릿을 사용하는 방법과 더 많은 제어를 원하는 사람들을 위해 처음부터 만드는 방법도 살펴볼 것입니다. 이렇게 하면 업무든 개인적인 계획이든 조직을 유지할 수 있습니다.

Excel 달력 템플릿을 사용하여 연간 달력 만들기
이 방법으로 컴퓨터가 네트워크에 연결되어 있는지 확인해야 합니다. 그래야만 Calendar Templates를 다운로드할 수 있습니다.
1. 파일 탭으로 이동하여 왼쪽 창의 새로 만들기 버튼을 클릭하고, 제안된 검색에서 Calendars를 클릭합니다. 스크린샷 보기:

2. 마음에 드는 달력 템플릿 중 하나를 선택하고, 두 번 클릭하여 연간 달력을 생성하세요.

결과

Kutools for Excel로 월간 또는 연간 달력 신속하게 만들기
Excel용 Kutools의 Perpetual Calendar 도구는 새 통합 문서에서 맞춤형 월간 달력이나 연간 달력을 빠르게 생성할 수 있으며, 각 월간 달력은 새 워크시트에 포함됩니다.
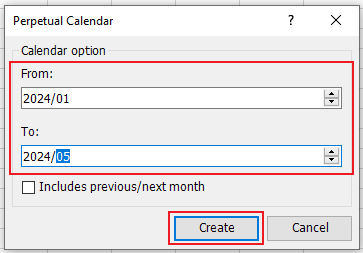
Kutools for Excel 설치 후, Kutools Plus > Worksheet > Perpetual Calendar을 클릭하세요. 나타나는 Perpetual Calendar 대화 상자에서 다음 단계를 따르세요:
- 월간 달력을 만들려면 From 및 To 드롭다운 목록을 통해 달력을 만들고자 하는 월을 지정한 후, Create를 클릭하세요.

- 연간 달력을 만들려면 From 및 To 드롭다운 목록을 통해 달력을 만들고자 하는 연도를 지정한 후, Create를 클릭하세요.

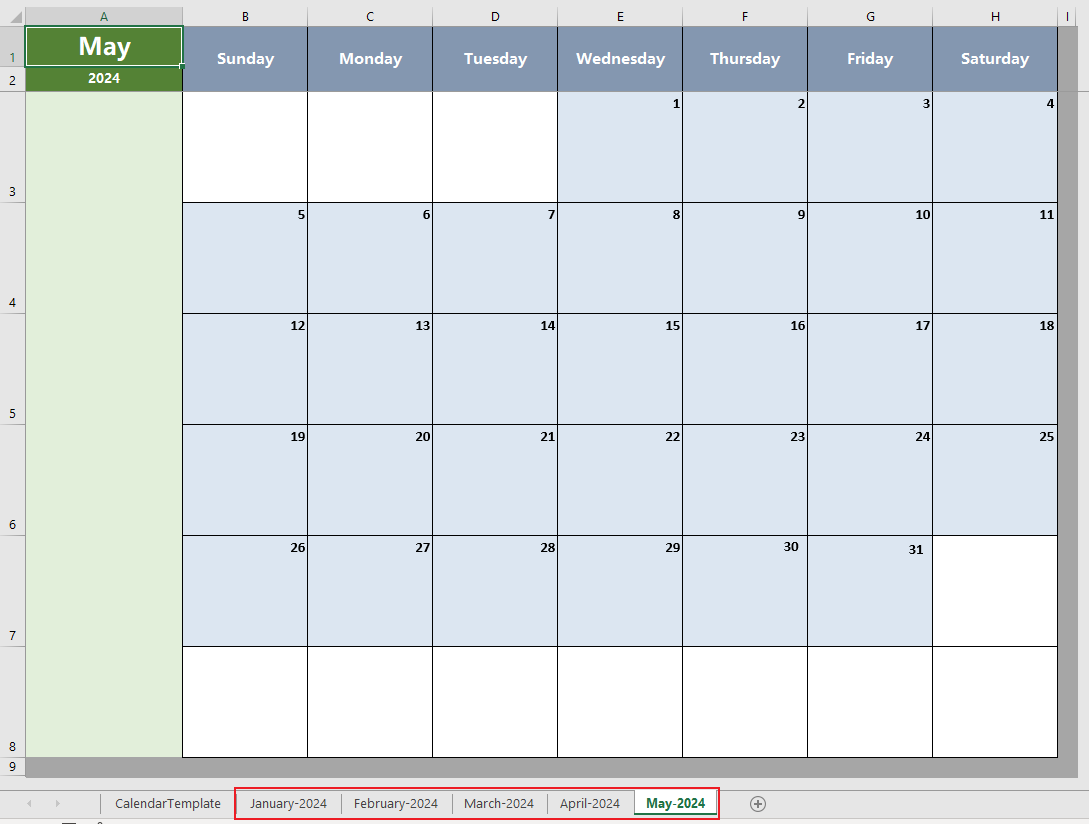
결과
- 월간 달력:

- 연간 달력:

VBA 코드로 월간 달력 만들기
다음 VBA 코드를 사용하면 월간 달력을 빠르게 만들 수 있습니다. 다음과 같이 진행하세요:
1. Alt + F11 키를 눌러 Microsoft Visual Basic for Applications 창을 엽니다.
2. 새 창이 표시됩니다. Insert > Module을 클릭하고 모듈에 다음 코드를 입력하세요:
 Sub CalendarMaker()
ActiveSheet.Protect DrawingObjects:=False, Contents:=False, _
Scenarios:=False
Application.ScreenUpdating = False
On Error GoTo MyErrorTrap
Range("a1:g14").Clear
MyInput = InputBox("Type in Month and year for Calendar ")
If MyInput = "" Then Exit Sub
StartDay = DateValue(MyInput)
If Day(StartDay) <> 1 Then
StartDay = DateValue(Month(StartDay) & "/1/" & _
Year(StartDay))
End If
Range("a1").NumberFormat = "mmmm yyyy"
With Range("a1:g1")
.HorizontalAlignment = xlCenterAcrossSelection
.VerticalAlignment = xlCenter
.Font.Size = 18
.Font.Bold = True
.RowHeight = 35
End With
With Range("a2:g2")
.ColumnWidth = 11
.VerticalAlignment = xlCenter
.HorizontalAlignment = xlCenter
.VerticalAlignment = xlCenter
.Orientation = xlHorizontal
.Font.Size = 12
.Font.Bold = True
.RowHeight = 20
End With
Range("a2") = "Sunday"
Range("b2") = "Monday"
Range("c2") = "Tuesday"
Range("d2") = "Wednesday"
Range("e2") = "Thursday"
Range("f2") = "Friday"
Range("g2") = "Saturday"
With Range("a3:g8")
.HorizontalAlignment = xlRight
.VerticalAlignment = xlTop
.Font.Size = 18
.Font.Bold = True
.RowHeight = 21
End With
Range("a1").Value = Application.Text(MyInput, "mmmm yyyy")
DayofWeek = Weekday(StartDay)
CurYear = Year(StartDay)
CurMonth = Month(StartDay)
FinalDay = DateSerial(CurYear, CurMonth + 1, 1)
Select Case DayofWeek
Case 1
Range("a3").Value = 1
Case 2
Range("b3").Value = 1
Case 3
Range("c3").Value = 1
Case 4
Range("d3").Value = 1
Case 5
Range("e3").Value = 1
Case 6
Range("f3").Value = 1
Case 7
Range("g3").Value = 1
End Select
For Each cell In Range("a3:g8")
RowCell = cell.Row
ColCell = cell.Column
If cell.Column = 1 And cell.Row = 3 Then
ElseIf cell.Column <> 1 Then
If cell.Offset(0, -1).Value >= 1 Then
cell.Value = cell.Offset(0, -1).Value + 1
If cell.Value > (FinalDay - StartDay) Then
cell.Value = ""
Exit For
End If
End If
ElseIf cell.Row > 3 And cell.Column = 1 Then
cell.Value = cell.Offset(-1, 6).Value + 1
If cell.Value > (FinalDay - StartDay) Then
cell.Value = ""
Exit For
End If
End If
Next
For x = 0 To 5
Range("A4").Offset(x * 2, 0).EntireRow.Insert
With Range("A4:G4").Offset(x * 2, 0)
.RowHeight = 65
.HorizontalAlignment = xlCenter
.VerticalAlignment = xlTop
.WrapText = True
.Font.Size = 10
.Font.Bold = False
.Locked = False
End With
With Range("A3").Offset(x * 2, 0).Resize(2, _
7).Borders(xlLeft)
.Weight = xlThick
.ColorIndex = xlAutomatic
End With
With Range("A3").Offset(x * 2, 0).Resize(2, _
7).Borders(xlRight)
.Weight = xlThick
.ColorIndex = xlAutomatic
End With
Range("A3").Offset(x * 2, 0).Resize(2, 7).BorderAround _
Weight:=xlThick, ColorIndex:=xlAutomatic
Next
If Range("A13").Value = "" Then Range("A13").Offset(0, 0) _
.Resize(2, 8).EntireRow.Delete
ActiveWindow.DisplayGridlines = False
ActiveSheet.Protect DrawingObjects:=True, Contents:=True, _
Scenarios:=True
ActiveWindow.WindowState = xlMaximized
ActiveWindow.ScrollRow = 1
Application.ScreenUpdating = True
Exit Sub
MyErrorTrap:
MsgBox "You may not have entered your Month and Year correctly." _
& Chr(13) & "Spell the Month correctly" _
& " (or use 3 letter abbreviation)" _
& Chr(13) & "and 4 digits for the Year"
MyInput = InputBox("Type in Month and year for Calendar")
If MyInput = "" Then Exit Sub
Resume
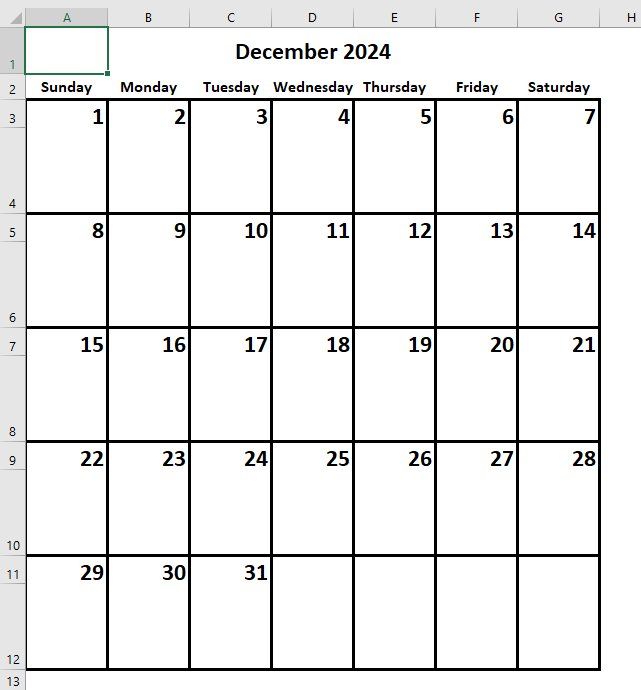
End Sub 3. 그런 다음 Run 버튼을 클릭하거나 F5 키를 눌러 애플리케이션을 실행합니다. 이제 프롬프트 박스가 나타나며, 빈칸에 월과 연도를 입력할 수 있습니다.

결과

관련 기사
Excel에서 드롭다운 목록 달력(날짜 선택기)을 만드는 방법은 무엇인가요?
Excel 워크시트의 드롭다운 달력을 사용하면 수동으로 입력하지 않고도 특정 날짜를 쉽게 선택할 수 있습니다. 이 튜토리얼에서는 ActiveX Control을 사용하여 Excel 워크시트에서 달력을 만드는 방법을 보여줍니다.
Excel에서 특정 셀을 클릭했을 때 달력을 팝업시키는 방법은 무엇인가요?
이 기사는 특정 범위의 셀을 클릭했을 때 달력이 팝업되고, 달력에서 날짜를 선택한 후 자동으로 선택한 셀에 날짜를 삽입하는 방법에 대해 설명합니다.
Excel 시트에서 Outlook 달력으로 일정을 만드는 방법은 무엇인가요?
때때로 Outlook 달력에 일정을 만들어야 할 수도 있습니다. 하지만 Excel 워크시트에 일정을 나열한 다음 아래 스크린샷처럼 Outlook 달력으로 가져오는 것을 시도해 본 적이 있나요?
Excel에서 동적 월간 달력을 만드는 방법은 무엇인가요?
이 기사는 Excel에서 동적 월간 달력을 만드는 방법을 자세히 보여줍니다.
최고의 오피스 생산성 도구
Kutools for Excel - 대중 속에서 돋보이게 도와드립니다
| 🤖 | Kutools AI Aide: 지능형 실행, 코드 생성, 사용자 정의 수식 작성, 데이터 분석 및 차트 생성, Kutools 기능 호출을 통한 데이터 분석 혁신… |
| 인기 기능: 중복 찾기, 강조 또는 식별 | 빈 행 삭제 | 데이터 손실 없이 열 또는 셀 병합 | 수식 없이 반올림 ... | |
| 슈퍼 VLookup: 다중 조건 | 다중 값 | 다중 시트 간 | 퍼지 매치... | |
| 고급 드롭다운 목록: 쉬운 드롭다운 목록 | 종속 드롭다운 목록 | 다중 선택 드롭다운 목록... | |
| 열 관리자: 특정 수의 열 추가 | 열 이동 | 숨겨진 열의 가시성 상태 전환 | 열 비교하여 동일하고 다른 셀 선택 ... | |
| 주요 기능: 그리드 포커스 | 디자인 보기 | 향상된 수식 표시줄 | 통합 문서 및 시트 관리자 | 자동 텍스트 라이브러리 (Auto Text) | 날짜 선택기 | 워크시트 병합 | 셀 암호화/해독 | 목록으로 이메일 보내기 | 슈퍼 필터 | 특별 필터 (filter bold/italic/strikethrough...) ... | |
| 상위 15개 도구 모음: 12개 텍스트 도구 (텍스트 추가, 특정 문자 삭제 ...) | 50개 이상의 차트 유형 (간트 차트 ...) | 40개 이상의 실용적인 수식 (생일을 기반으로 나이 계산 ...) | 19개 삽입 도구 (QR 코드 삽입, 경로에서 그림 삽입 ...) | 12개 변환 도구 (숫자를 단어로, 통화 변환 ...) | 7개 병합 및 분할 도구 (고급 행 병합, 엑셀 셀 분할 ...) | ... 그리고 더 많은 기능들 |
Kutools for Excel은 300가지 이상의 기능을 자랑하며, 원하는 기능이 단 한 번의 클릭만으로 가능합니다...
Office Tab - 마이크로소프트 오피스(엑셀 포함)에서 탭 방식의 읽기 및 편집 활성화
- 수십 개의 열린 문서 간에 1초 만에 전환하세요!
- 매일 수백 번의 마우스 클릭을 줄이고, '마우스 손'과 작별하세요.
- 여러 문서를 보고 편집할 때 생산성을 50% 향상시킵니다.
- 크롬, 엣지 및 파이어폭스처럼 오피스(엑셀 포함)에 효율적인 탭을 제공합니다.