Excel 에서 제한된 범위의 셀 범위로부터 이메일을 보내는 방법은 무엇인가요?
종종 중요한 데이터나 보고서를 Excel 통합 문서에서 직접 다른 사람과 공유해야 할 필요가 있으며, 이메일 본문에 특정 셀 범위의 내용을 포함시키면 시간을 절약하고 정확성을 확보할 수 있습니다. 예를 들어, 선택한 재무 요약, 학생 성적, 재고 데이터 등을 Excel 에서 바로 이메일로 보내면 수신자가 첨부 파일을 열지 않고도 핵심 정보를 확인할 수 있습니다. 이 문서에서는 이메일 본문에 범위 선택을(를) 삽입하여 Excel 에서 직접 이메일을 보내는 실용적인 방법을 설명합니다。
Excel 에서 제한된 범위의 셀 범위로부터 이메일 보내기
놀라운 도구로 제한된 범위의 셀 범위로부터 이메일 보내기
Excel 에서 메일링 관련 추가 자습서。。。
Excel 에서 제한된 범위의 셀 범위로부터 이메일 보내기
내장형이며 사용자 정의 가능한 방식을 선호한다면, Excel 내 VBA 코드를 사용하여 선택한 셀 범위를 복사하고 자동으로 Outlook 이메일 본문에 붙여넣는 것이 효율적인 방법입니다. 이 방법은 Microsoft Outlook 을 기본 이메일 클라이언트로 자주 사용하며 Excel 에서 직접 이메일 발송을 자동화해야 하는 사용자에게 적합합니다。 다음은 이를 수행하는 방법입니다:
1. 이메일에 삽입할 셀 범위가 포함된 워크시트를 엽니다。Alt + F11을(를) 동시에 눌러Microsoft Visual Basic for Applications창을 실행하세요。 이 단축키를 사용하면 코드를 삽입할 VBA 편집기에 빠르게 접근할 수 있습니다。
2. VBA 편집기 창에서도구>참조를 클릭하세요。 여러 파일이 열려 있는 경우 올바른 워크북을 선택했는지 확인하세요。
3. 참조 – VBAProject대화 상자에서 스크롤하여Microsoft Outlook Object Library옵션을 선택하세요. 이 참조를 활성화하면 VBA 가 Outlook 과 상호작용하여 직접 이메일을 생성 및 발송할 수 있습니다。 확인란을 선택한 후확인을(를) 클릭하세요。

4. 메뉴 표시줄에서삽입>모듈을(를) 클릭하여 새 코드 모듈을 추가하세요。 그런 다음 다음 VBA 코드를 모듈 창에 복사하여 붙여넣으세요。
VBA 코드: Excel 에서 제한된 범위과(와) 함께 이메일 보내기
Sub Send_Email()
'Updated by Extendoffice 20200119
    Dim xRg As Range
    Dim I, J As Long
    Dim xAddress As String
    Dim xEmailBody As String
    Dim xMailOut As Outlook.MailItem
    Dim xOutApp As Outlook.Application
    On Error Resume Next
    xAddress = ActiveWindow.RangeSelection.Address
    Set xRg = Application.InputBox("Please select range you need to paste into email body", "KuTools For Excel", xAddress, , , , , 8)
If xRg Is Nothing Then Exit Sub
Application.ScreenUpdating = False
    Set xOutApp = CreateObject("Outlook.Application")
    Set xMailOut = xOutApp.CreateItem(olMailItem)
    For I = 1 To xRg.Rows.Count
        For J = 1 To xRg.Columns.Count
            xEmailBody = xEmailBody & "  " & xRg.Cells(I, J).value
        Next
        xEmailBody = xEmailBody & vbNewLine
    Next
    xEmailBody = "Hi" & vbLf & vbLf & " body of message you want to add" & vbLf & vbLf & xEmailBody & vbNewLine
    With xMailOut
        .Subject = "Test"
        .To = "happy.xuebi@163.com"
        .Body = xEmailBody
        .Display
        '.Send
    End With
    Set xMailOut = Nothing
    Set xOutApp = Nothing
    Application.ScreenUpdating = True
End Sub
참고:
- 1)。 필요에 따라xEmailBody = 「Hi」 & vbLf & vbLf & " body of message you want to add" & vbLf & vbLf & xEmailBody & vbNewLine줄의 내용과 인사말을 사용자 정의할 수 있습니다。 예를 들어, Excel 데이터 앞에 특정 메시지나 지침을 추가하고 싶을 수도 있습니다。
- 2)。 이 줄을 수정하여 수신자와 제목을 조정하세요:.To = happy.xuebi@163.com 및.Subject = 「Test」。 배달 문제를 방지하려면 수신자의 이메일 주소가 정확한지 확인하세요。
5. 코드를 실행하려면 VBA 편집기에서F5를 누르세요。 Kutools for Excel 대화 상자가 나타나면 이메일 본문에 포함할 셀 범위를 선택하고확인을(를) 클릭하세요。 잘못된 범위를 선택한 경우 프로세스를 다시 시작하거나 선택을 수정할 수 있습니다。

6. 지정된 수신자, 제목, 삽입된 메시지 및 Excel 데이터가 포함된 Outlook 이메일이 자동으로 생성됩니다。 발송 전 메시지를 미리 보고 모든 데이터가 올바르게 표시되는지 확인하세요。 이메일을 발송하려면보내기버튼을 클릭하세요。

참고:이 VBA 방법은 Microsoft Outlook 이 설치되어 있고 기본 이메일 클라이언트로 설정되어 있을 때만 작동합니다. 다른 이메일 프로그램을 사용하는 경우 아래 설명된 다른 솔루션을 고려하세요. 또한 Outlook 이 실행 중이 아니면 매크로가 자동으로 실행합니다。
제한 사항:이 방법은 Outlook 과 이메일 기능에 대한 적절한 권한이 필요합니다。 조직에서 매크로 사용이나 Outlook 접근을 제한하는 경우 이 방법을 적용할 수 없습니다。
놀라운 도구로 제한된 범위의 셀 범위로부터 이메일 보내기
Outlook 을 사용하지 않거나 코드 없이 더 간단한 방법을 선호하는 사용자의 경우, Kutools for Excel 은 선택한 셀 범위를 포함한 이메일 메시지를 보내기 위한 간편한 솔루션을 제공합니다. Kutools 의 「이메일 보내기」 기능을 사용하면 발신 서버(SMTP)를 구성하고 Gmail, Yahoo 또는 회사 메일과 같은 지원되는 모든 이메일 계정을 통해 Excel 에서 직접 이메일을 보낼 수 있습니다。 이는 다양한 환경에서 작업하거나 여러 수신자와 정보를 공유해야 할 때 유연한 선택지가 됩니다。
이 방법을 사용하려면 다음 단계를 따르세요:
1. 먼저 필요한 필드가 포함된 이메일 목록을 준비해야 합니다。
- 팁:이메일 목록에는 최소 두 개의 행이 필요합니다。 하나는 헤더용이고, 하나 이상은 실제 데이터용입니다。 예를 들어 두 명에게 이메일을 보낼 경우, 아래 스크린샷과 같이 「이메일」 헤더 아래에 두 이메일 주소를 모두 입력하세요。

- 빠르게 이메일 목록을(를) 만들고 싶다면, 자동 설정을 위한메일링 목록 생성기능을 사용해 보세요。

2. 다음으로 이메일 메시지 본문에 붙여넣을 실제 Excel 범위를 선택한 후Ctrl + C를 눌러 복사하세요。 이메일의 명확성을 위해 필요한 셀만 복사하세요。
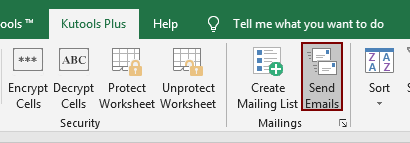
3. 전체 이메일 목록(헤더 포함)를 선택한 후Kutools 플러스>이메일 보내기로 이동하세요。
4. 「이메일 보내기」 대화 상자가 나타나며 선택한 이메일 목록에서 가져온 필드가 표시됩니다。
- 4.1) 필요에 따라 대화 상자의 항목을 검토하고 조정하세요。 맞춤형 메시지나 추가 정보가 필요한 경우 이메일 목록에 더 많은 필드를 추가할 수 있습니다。
- 4.2) 「이메일 본문」 상자 안을 클릭한 후Ctrl + V를 눌러 복사한 범위를 붙여넣으세요。 필요 시 추가 텍스트나 지침을 입력하여 이메일 메시지가 명확하고 유익하도록 하세요。
- 4.3) SMTP(기타 이메일 서비스)를 통해 보내려면 「Outlook 사용하여 보내기」가선택되지 않은 상태인지 확인하세요。
- 4.4) Outlook 외 계정에서 직접 발송하려면 이메일 계정의 SMTP 설정을 구성해야 합니다.为此,SMTP 설정을(를) 클릭하세요。


5. 「메일 서버 설정 – 새 스키마」 대화 상자에서 이메일 주소, SMTP 서버, 포트 번호 및 인증 정보와 같은 필수 세부 정보를 모두 입력하세요。 「보낸 이메일 저장 위치」 확인란을 선택하여 보낸 이메일을 지정된 폴더에 저장할 수도 있습니다。 이렇게 하면 커뮤니케이션을 추적할 수 있습니다。 설정을 완료한 후확인을(를) 클릭하여 확인하세요。

6. 「이메일 보내기」 창으로 돌아갑니다。 모든 필드와 붙여넣은 내용을 정확히 다시 확인한 후보내기를 클릭하여 이메일을 발송하세요. 이메일은 구성된 서버를 통해 Excel 에서 직접 발송되며 결과에 따라 확인 메시지나 상태가 표시됩니다。
장점:Kutools 는 Outlook 뿐 아니라 거의 모든 SMTP 를 지원하는 계정에서 이메일을 보낼 수 있도록 지원하므로, 웹메일을 사용하거나 여러 도메인을 관리하거나 매크로 코딩 없이도 사용하기 쉬운 인터페이스를 원하는 사용자에게 이상적입니다。
Kutools 를 사용할 때는 서버 설정을 신중히 확인하여 발송 실패 오류를 방지하세요。 이메일이 전송되지 않으면 네트워크 연결 상태, 서버 주소, 포트 번호 및 로그인 자격 증명을 다시 확인하십시오。
대량 이메일 발송 시에는 대량 발송 전에 반드시 하나 이상의 메시지를 미리 확인하여 표시 오류나 개인화 문제를 수정하세요。
관련 문서:
Excel 셀에 지정된 이메일 주소에게 이메일 보내기
예를 들어, 이메일 주소 목록이 있고 이를 Excel 에서 대량으로 직접 이메일로 보내고 싶다고 가정해 보겠습니다。 이를 어떻게 구현할 수 있을까요? 이 문서에서는 Excel 셀에 지정된 여러 이메일 주소에게 이메일을 보내는 방법을 소개합니다。
Excel 에서 이메일을 보낼 때 Outlook 서명 삽입하기
Excel 에서 직접 이메일을 보내고 싶을 때, 해당 이메일에 기본 Outlook 서명을 어떻게 추가할 수 있을까요? 이 문서에서는 Excel 에서 이메일을 보낼 때 Outlook 서명을 추가하는 두 가지 방법을 제공합니다。
Excel 에서 여러 첨부 파일을 함께 이메일 보내기
이 문서는 Excel 에서 Outlook 을 통해 여러 첨부 파일을 포함한 이메일을 보내는 방법에 대해 설명합니다。
Excel 에서 마감일 조건이 충족되면 이메일 보내기
예를 들어, C 열의 마감일이 7 일인 경우(현재 날짜 기준 2017/9/13), A 열에 지정된 수신자에게 B 열에 지정된 내용으로 이메일 알림을 보내야 한다고 가정해 보겠습니다。 이를 어떻게 구현할 수 있을까요? 이 문서에서는 이 문제를 해결하기 위한 VBA 방법을 자세히 제공합니다。
Excel 에서 셀 값에 따라 자동으로 이메일 보내기
Excel 에서 특정 셀 값에 따라 Outlook 을 통해 특정 수신자에게 이메일을 보내고 싶다고 가정해 보겠습니다. 예를 들어 워크시트의 D7 셀 값이 200 보다 크면 자동으로 이메일이 생성됩니다。 이 문서에서는 이 문제를 빠르게 해결할 수 있는 VBA 방법을 소개합니다。
최고의 Office 생산성 도구
| 🤖 | KUTOOLS AI 도우미: 다음을 기반으로 데이터 분석 혁신하기:지능형 실행 | 코드 생성| 사용자 지정 수식 생성 | 데이터 분석 및 차트 생성| 향상된 함수 호출… |
| 인기 기능:찾기, 강조 표시 또는 중복 표시 | 빈 행 삭제 | 데이터 손실 없이 열 결합 또는 셀 제거 | 공식을 사용하지 않는 반올림... | |
| 슈퍼 LOOKUP:다중 조건 VLookup | 다중 값 VLookup | 여러 시트에서 VLookup | 퍼지 매치.... | |
| 고급 드롭다운 목록:드롭다운 목록 빠르게 생성 | 종속형 드롭다운 목록 | 다중 선택 드롭다운 목록.... | |
| 열 관리자:특정 수의 열 추가|열 이동|숨겨진 열의 표시 상태 전환|범위 및 열 비교... | |
| 주요 기능:그리드 포커스 | 디자인 보기 |향상된 수식 표시줄 | 워크북 및 시트 관리자 | 자원 라이브러리(자동 텍스트)| 날짜 선택기 | 워크시트 병합 | 암호화/셀 해독 | 목록으로 이메일 보내기 | 슈퍼 필터 | 특수 필터(굵은 글꼴이 있는 셀 필터링/기울임꼴/취소선。。。) 。。。 | |
| 상위 15 도구 모음:12 텍스트도구(텍스트 추가,특정 문자 삭제, ...)| 50+차트유형(간트 차트, ...)| 40+ 실용적인수식(생일을 기준으로 나이 계산, ...)| 19 삽입도구(QR 코드 삽입,경로에서 그림 삽입, ...)| 12 변환도구(단어로 변환하기,환율 변환, ...)| 7 병합 및 분할도구(고급 행 병합,셀 분할, ...)|그 외 더 많은 기능 |
Kutools for Excel 로 Excel 역량을 한 단계 업그레이드하고 전례 없는 효율성을 경험하세요。Kutools for Excel 는 생산성과 저장 시간을 향상시키는 300 개 이상의 고급 기능을 제공합니다。가장 필요한 기능을 지금 바로 확인하세요。。。
Office Tab 가 Office 에 탭 인터페이스를 제공하여 작업을 훨씬 쉽게 만들어 줍니다
- Word, Excel, PowerPoint 에서 탭 기반 편집 및 읽기 기능을 활성화합니다, Publisher, Access, Visio 및 Project 에서도 사용 가능합니다。
- 새 창이 아닌 동일한 창의 새 탭에서 여러 문서를 열고 생성할 수 있습니다。
- 50% 만큼 생산성을 높이고 매일 수백 번의 마우스 클릭을 줄여줍니다!
모든 Kutools 애드인。 하나의 설치 프로그램
Kutools for Office스위트 번들은 Excel, Word, Outlook 및 PowerPoint 용 애드인과 Office Tab Pro 를 포함하며, 다양한 Office 앱을 사용하는 팀에 이상적입니다。
- 올인원 스위트— Excel, Word, Outlook 및 PowerPoint 애드인 + Office Tab Pro
- 하나의 설치 프로그램, 하나의 라이선스— 몇 분 안에 설정 완료(MSI 지원)
- 함께 사용할수록 더 효과적입니다— Office 앱 전반에서 생산성 향상
- 30 일간 모든 기능 무료 체험— 등록이나 신용카드 필요 없음
- 최고의 가성비— 개별 애드인 구매 대비 절약