Excel에서 월별/연간 달력을 만드는 방법은 무엇입니까?
특정 월 또는 연도의 달력을 Excel에서 만들어야 할 때가 있습니다. 이를 빠르게 해결하려면 어떻게 해야 할까요? 이 튜토리얼에서는 Excel에서 월별 또는 연간 달력을 빠르게 만드는 방법을 소개합니다.
Excel 템플릿으로 월별 또는 연간 달력 만들기
Excel에서는 달력 템플릿을 사용하여 월별 또는 연간 달력을 만들 수 있습니다.
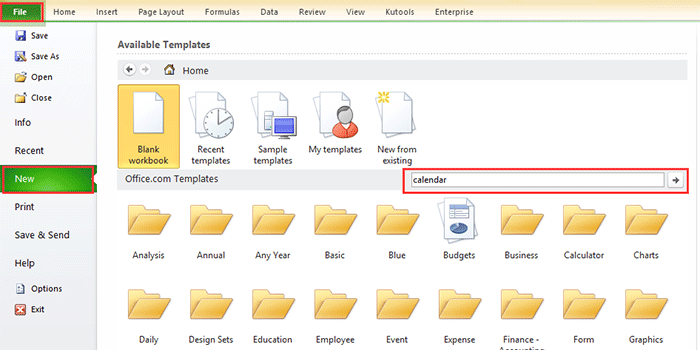
1. Excel 2010/2013에서는 파일 > 새로 만들기, Excel 2007에서는 Office 버튼 > 새로 만들기를 클릭한 다음, 나타나는 창의 오른쪽 섹션에서 검색 엔진에 'calendar'를 입력하세요. 스크린샷 보기:
Excel 2010/2013에서
Excel 2007에서

2. Enter 키를 누르면 여러 종류의 달력이 창에 나열됩니다. 필요한 달력 유형을 선택하고 오른쪽 창에서 다운로드(또는 생성)를 클릭하세요. 스크린샷 보기:

이제 새 워크북에 달력이 생성되었습니다. 스크린샷 보기:

VBA로 월별 달력 만들기
때때로 특정 월(예: 2015년 1월)의 한 달짜리 달력을 만들어야 할 때가 있습니다. 위의 방법으로 그런 달력 템플릿을 찾기가 어려울 수 있습니다. 여기서는 특정 월의 달력을 생성하는 데 도움이 되는 VBA 코드를 소개합니다.
1. Alt + F11 키를 눌러 Microsoft Visual Basic for Applications 창을 열고, 삽입 > 모듈을 클릭한 다음 아래 VBA 코드를 복사하여 창에 붙여넣습니다.
VBA: 월별 달력 만들기.
Sub CalendarMaker()
       ' Unprotect sheet if had previous calendar to prevent error.
       ActiveSheet.Protect DrawingObjects:=False, Contents:=False, _
          Scenarios:=False
       ' Prevent screen flashing while drawing calendar.
       Application.ScreenUpdating = False
       ' Set up error trapping.
       On Error GoTo MyErrorTrap
       ' Clear area a1:g14 including any previous calendar.
       Range("a1:g14").Clear
       ' Use InputBox to get desired month and year and set variable
       ' MyInput.
       MyInput = InputBox("Type in Month and year for Calendar ")
       ' Allow user to end macro with Cancel in InputBox.
       If MyInput = "" Then Exit Sub
       ' Get the date value of the beginning of inputted month.
       StartDay = DateValue(MyInput)
       ' Check if valid date but not the first of the month
       ' -- if so, reset StartDay to first day of month.
       If Day(StartDay) <> 1 Then
           StartDay = DateValue(Month(StartDay) & "/1/" & _
               Year(StartDay))
       End If
       ' Prepare cell for Month and Year as fully spelled out.
       Range("a1").NumberFormat = "mmmm yyyy"
       ' Center the Month and Year label across a1:g1 with appropriate
       ' size, height and bolding.
       With Range("a1:g1")
           .HorizontalAlignment = xlCenterAcrossSelection
           .VerticalAlignment = xlCenter
           .Font.Size = 18
           .Font.Bold = True
           .RowHeight = 35
       End With
       ' Prepare a2:g2 for day of week labels with centering, size,
       ' height and bolding.
       With Range("a2:g2")
           .ColumnWidth = 11
           .VerticalAlignment = xlCenter
           .HorizontalAlignment = xlCenter
           .VerticalAlignment = xlCenter
           .Orientation = xlHorizontal
           .Font.Size = 12
           .Font.Bold = True
           .RowHeight = 20
       End With
       ' Put days of week in a2:g2.
       Range("a2") = "Sunday"
       Range("b2") = "Monday"
       Range("c2") = "Tuesday"
       Range("d2") = "Wednesday"
       Range("e2") = "Thursday"
       Range("f2") = "Friday"
       Range("g2") = "Saturday"
       ' Prepare a3:g7 for dates with left/top alignment, size, height
       ' and bolding.
       With Range("a3:g8")
           .HorizontalAlignment = xlRight
           .VerticalAlignment = xlTop
           .Font.Size = 18
           .Font.Bold = True
           .RowHeight = 21
       End With
       ' Put inputted month and year fully spelling out into "a1".
       Range("a1").Value = Application.Text(MyInput, "mmmm yyyy")
       ' Set variable and get which day of the week the month starts.
       DayofWeek = WeekDay(StartDay)
       ' Set variables to identify the year and month as separate
       ' variables.
       CurYear = Year(StartDay)
       CurMonth = Month(StartDay)
       ' Set variable and calculate the first day of the next month.
       FinalDay = DateSerial(CurYear, CurMonth + 1, 1)
       ' Place a "1" in cell position of the first day of the chosen
       ' month based on DayofWeek.
       Select Case DayofWeek
           Case 1
               Range("a3").Value = 1
           Case 2
               Range("b3").Value = 1
           Case 3
               Range("c3").Value = 1
           Case 4
               Range("d3").Value = 1
           Case 5
               Range("e3").Value = 1
           Case 6
               Range("f3").Value = 1
           Case 7
               Range("g3").Value = 1
       End Select
       ' Loop through range a3:g8 incrementing each cell after the "1"
       ' cell.
       For Each cell In Range("a3:g8")
           RowCell = cell.Row
           ColCell = cell.Column
           ' Do if "1" is in first column.
           If cell.Column = 1 And cell.Row = 3 Then
           ' Do if current cell is not in 1st column.
           ElseIf cell.Column <> 1 Then
               If cell.Offset(0, -1).Value >= 1 Then
                   cell.Value = cell.Offset(0, -1).Value + 1
                   ' Stop when the last day of the month has been
                   ' entered.
                   If cell.Value > (FinalDay - StartDay) Then
                       cell.Value = ""
                       ' Exit loop when calendar has correct number of
                       ' days shown.
                       Exit For
                   End If
               End If
           ' Do only if current cell is not in Row 3 and is in Column 1.
           ElseIf cell.Row > 3 And cell.Column = 1 Then
               cell.Value = cell.Offset(-1, 6).Value + 1
               ' Stop when the last day of the month has been entered.
               If cell.Value > (FinalDay - StartDay) Then
                   cell.Value = ""
                   ' Exit loop when calendar has correct number of days
                   ' shown.
                   Exit For
               End If
           End If
       Next

       ' Create Entry cells, format them centered, wrap text, and border
       ' around days.
       For x = 0 To 5
           Range("A4").Offset(x * 2, 0).EntireRow.Insert
           With Range("A4:G4").Offset(x * 2, 0)
               .RowHeight = 65
               .HorizontalAlignment = xlCenter
               .VerticalAlignment = xlTop
               .WrapText = True
               .Font.Size = 10
               .Font.Bold = False
               ' Unlock these cells to be able to enter text later after
               ' sheet is protected.
               .Locked = False
           End With
           ' Put border around the block of dates.
           With Range("A3").Offset(x * 2, 0).Resize(2, _
           7).Borders(xlLeft)
               .Weight = xlThick
               .ColorIndex = xlAutomatic
           End With

           With Range("A3").Offset(x * 2, 0).Resize(2, _
           7).Borders(xlRight)
               .Weight = xlThick
               .ColorIndex = xlAutomatic
           End With
           Range("A3").Offset(x * 2, 0).Resize(2, 7).BorderAround _
              Weight:=xlThick, ColorIndex:=xlAutomatic
       Next
       If Range("A13").Value = "" Then Range("A13").Offset(0, 0) _
          .Resize(2, 8).EntireRow.Delete
       ' Turn off gridlines.
       ActiveWindow.DisplayGridlines = False
       ' Protect sheet to prevent overwriting the dates.
       ActiveSheet.Protect DrawingObjects:=True, Contents:=True, _
          Scenarios:=True

       ' Resize window to show all of calendar (may have to be adjusted
       ' for video configuration).
       ActiveWindow.WindowState = xlMaximized
       ActiveWindow.ScrollRow = 1

       ' Allow screen to redraw with calendar showing.
       Application.ScreenUpdating = True
       ' Prevent going to error trap unless error found by exiting Sub
       ' here.
       Exit Sub
   ' Error causes msgbox to indicate the problem, provides new input box,
   ' and resumes at the line that caused the error.
   MyErrorTrap:
       MsgBox "You may not have entered your Month and Year correctly." _
           & Chr(13) & "Spell the Month correctly" _
           & " (or use 3 letter abbreviation)" _
           & Chr(13) & "and 4 digits for the Year"
       MyInput = InputBox("Type in Month and year for Calendar")
       If MyInput = "" Then Exit Sub
       Resume
   End Sub
VBA는 https://support.microsoft.com/en-us/kb/150774 웹사이트에서 가져온 것입니다.
2. F5 키 또는 실행 버튼을 누르면 특정 월을 입력하라는 대화 상자가 나타납니다. 스크린샷 보기:

3. 확인을 클릭합니다. 이제 활성 시트에 2015년 1월 달력이 생성됩니다.

하지만 위의 방법들에는 몇 가지 제한 사항이 있습니다. 예를 들어, 1월부터 5월까지의 달력을 한 번에 만들려면 위 두 가지 방법으로 다섯 번의 달력을 만들어야 합니다. 이제 이를 빠르고 쉽게 해결할 수 있는 유용한 유틸리티를 소개합니다.
연속 달력으로 쉽게 월별 또는 연간 달력 만들기
연속 달력은 Kutools for Excel의 강력한 유틸리티 중 하나로, 한 번에 월별 또는 연간 달력을 빠르게 생성하는 데 도움이 됩니다.
1. Kutools Plus > 워크시트 > 연속 달력을 클릭합니다.
2. 나타나는 대화 상자에서 달력을 만들 월 기간을 지정하고 생성을 클릭합니다. 스크린샷 보기:

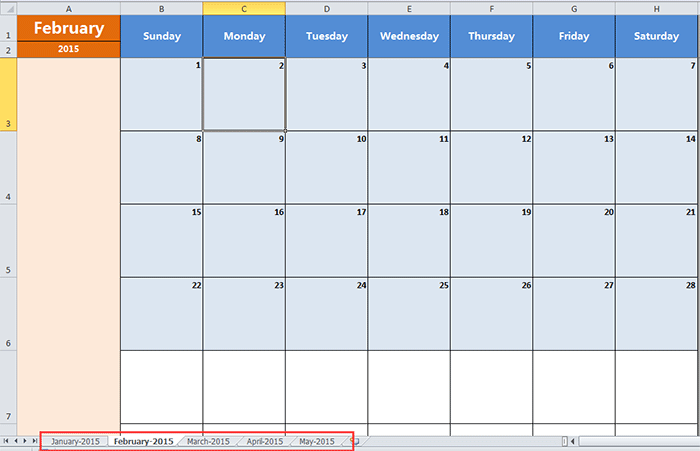
그러면 다섯 개의 달력 워크시트가 포함된 새 워크북이 생성됩니다. 스크린샷 보기:
팁:
특정 월의 달력만 만들고 싶다면 대화 상자의 시작과 종료 텍스트 상자에 동일한 월을 선택하면 됩니다.
연속 달력에 대해 자세히 알아보려면 여기를 클릭하세요.
최고의 오피스 생산성 도구
| 🤖 | Kutools AI 도우미: 데이터 분석에 혁신을 가져옵니다. 방법: 지능형 실행 | 코드 생성 | 사용자 정의 수식 생성 | 데이터 분석 및 차트 생성 | Kutools Functions 호출… |
| 인기 기능: 중복 찾기, 강조 또는 중복 표시 | 빈 행 삭제 | 데이터 손실 없이 열 또는 셀 병합 | 반올림(수식 없이) ... | |
| 슈퍼 LOOKUP: 다중 조건 VLOOKUP | 다중 값 VLOOKUP | 다중 시트 조회 | 퍼지 매치 .... | |
| 고급 드롭다운 목록: 드롭다운 목록 빠르게 생성 | 종속 드롭다운 목록 | 다중 선택 드롭다운 목록 .... | |
| 열 관리자: 지정한 수의 열 추가 | 열 이동 | 숨겨진 열의 표시 상태 전환 | 범위 및 열 비교 ... | |
| 추천 기능: 그리드 포커스 | 디자인 보기 | 향상된 수식 표시줄 | 통합 문서 & 시트 관리자 | 자동 텍스트 라이브러리 | 날짜 선택기 | 데이터 병합 | 셀 암호화/해독 | 목록으로 이메일 보내기 | 슈퍼 필터 | 특수 필터(굵게/이탤릭/취소선 필터 등) ... | |
| 15대 주요 도구 세트: 12 가지 텍스트 도구(텍스트 추가, 특정 문자 삭제, ...) | 50+ 종류의 차트(간트 차트, ...) | 40+ 실용적 수식(생일을 기반으로 나이 계산, ...) | 19 가지 삽입 도구(QR 코드 삽입, 경로에서 그림 삽입, ...) | 12 가지 변환 도구(단어로 변환하기, 통화 변환, ...) | 7 가지 병합 & 분할 도구(고급 행 병합, 셀 분할, ...) | ... 등 다양 |
Kutools for Excel과 함께 엑셀 능력을 한 단계 끌어 올리고, 이전에 없던 효율성을 경험하세요. Kutools for Excel은300개 이상의 고급 기능으로 생산성을 높이고 저장 시간을 단축합니다. 가장 필요한 기능을 바로 확인하려면 여기를 클릭하세요...
Office Tab은 Office에 탭 인터페이스를 제공하여 작업을 더욱 간편하게 만듭니다
- Word, Excel, PowerPoint에서 탭 편집 및 읽기를 활성화합니다.
- 새 창 대신 같은 창의 새로운 탭에서 여러 파일을 열고 생성할 수 있습니다.
- 생산성이50% 증가하며, 매일 수백 번의 마우스 클릭을 줄여줍니다!
모든 Kutools 추가 기능. 한 번에 설치
Kutools for Office 제품군은 Excel, Word, Outlook, PowerPoint용 추가 기능과 Office Tab Pro를 한 번에 제공하여 Office 앱을 활용하는 팀에 최적입니다.
- 올인원 제품군 — Excel, Word, Outlook, PowerPoint 추가 기능 + Office Tab Pro
- 설치 한 번, 라이선스 한 번 — 몇 분 만에 손쉽게 설정(MSI 지원)
- 함께 사용할 때 더욱 효율적 — Office 앱 간 생산성 향상
- 30일 모든 기능 사용 가능 — 회원가입/카드 불필요
- 최고의 가성비 — 개별 추가 기능 구매 대비 절약